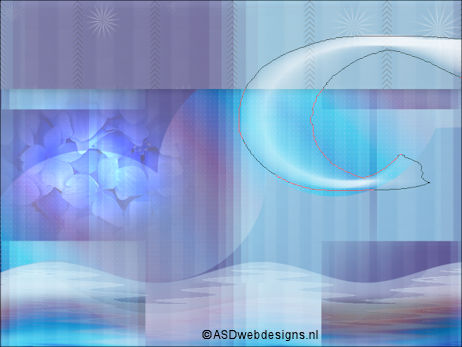
The tutorial:
01
Open a new
transparent image of 800 x 600 px
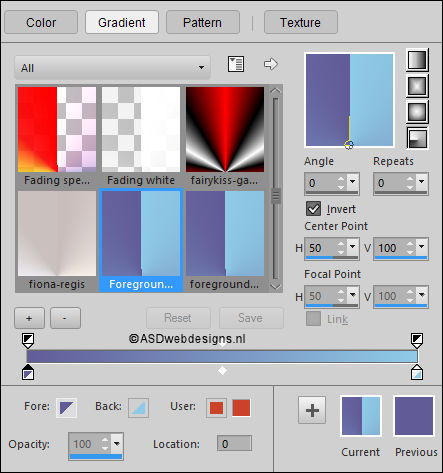
Fill with the Gradient

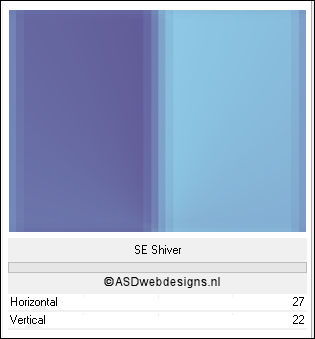
Effects -
Plugins - <ICNET Software>
- Filters Unlimited 20
-&<BKg Designer sf10 III>
-
SE Shiver - Default
02
Layers - Duplicate
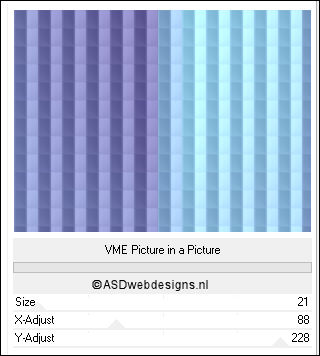
Effects -
Plugins - <ICNET Software>
- Filters Unlimited 20
-&<BKg Designer sf10 III>
-
VME
Picture in a Picture -
Default
Effects - Plugins - Simple
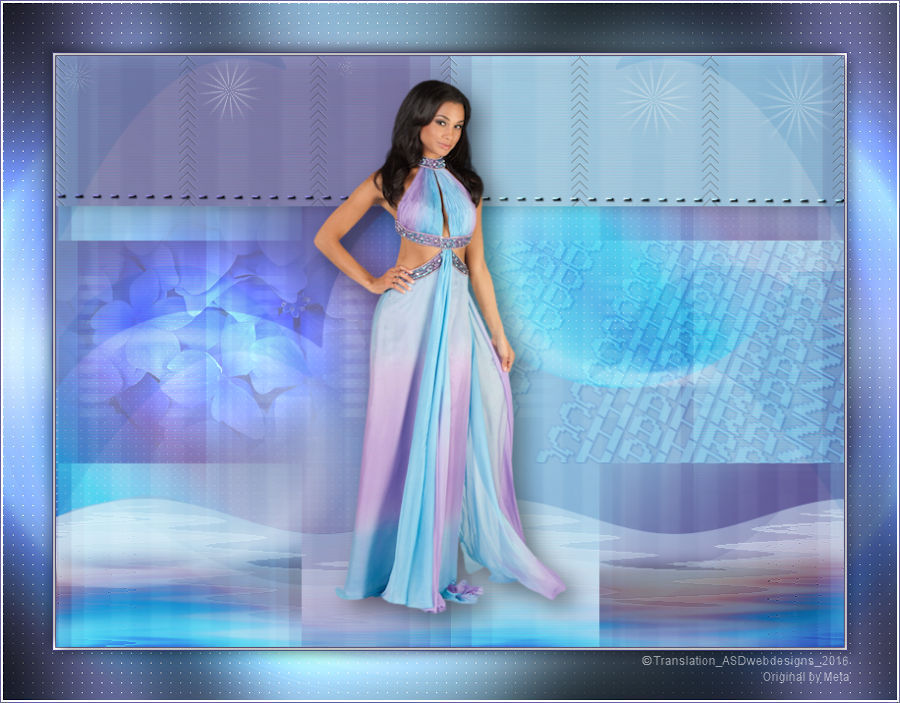
- Horizontal Grain
Layer Palette - Double click on this Layer and set the
Blend Mode to "Soft Light" and the Layer Opacity to
42
Layers - Merge - Merge
Visible
Adjust - Sharpness
Sharpen
Window - Duplicate
(or shift+D) - Minimize to tray
(Save as PSP file in case PSP shuts
down on you) and go back to the
original
03
Layers - Duplicate
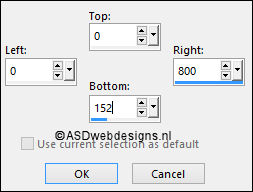
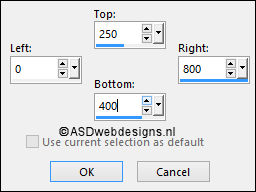
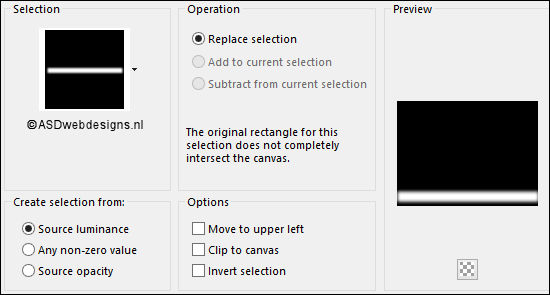
Selection Tool -
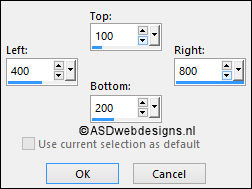
Rectangle  -
Custom Selection:
-
Custom Selection: 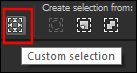
Selections - Promote Selection to
Layer
Effects -
Plugins - <ICNET Software>
- Filters Unlimited 20
-&<BKg Designer sf10 III>
-
Road Kill - Default
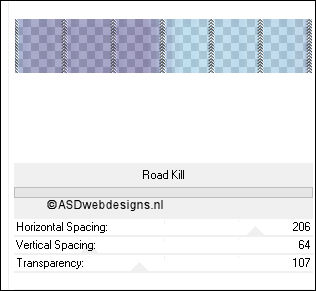
Keep selected
04
Layer Palette - Click on the
Bottom Layer (Merged)
Selections - Promote Selection to
Layer
Layers -
Arrange - Move up
Effects - Plugins -
<ICNET Software>
- Filters Unlimited 20
-&<BKg Designer sf10 III>
- VMT Stardust
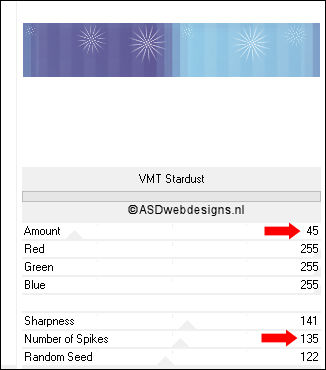
Selections - Select None
05
Layer Palette - Click on the
Top Layer (Promoted Selection)
Effects - 3D
Effects - Drop Shadow - Vertical 5 -
Horizontal 5 - Opacity 30 -
Blur - 15 - Color - #000000

Layer Palette - Double click on this Layer and
set the Opacity of this Layer to
84
Layers - Merge - Merge
Down
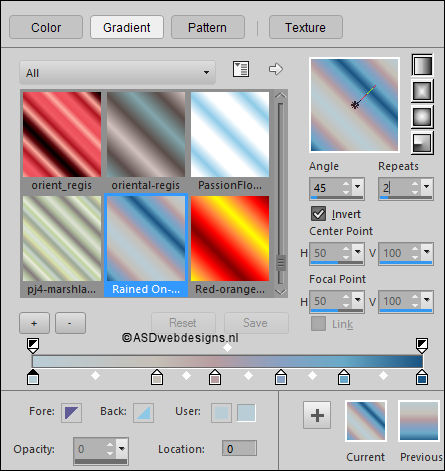
06
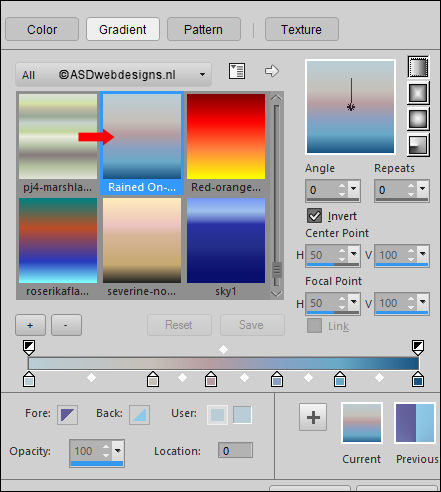
Color Palette: Set
your Foregroundcolor to the
Rained
On-FK from the
Materials- Style:
Linear
Layers - New Raster
Layer
Selection Tool -
Rectangle -
Custom Selection:
Fill the Selection
with the Gradient 
Selections - Select None
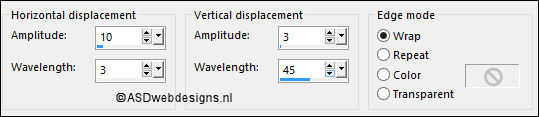
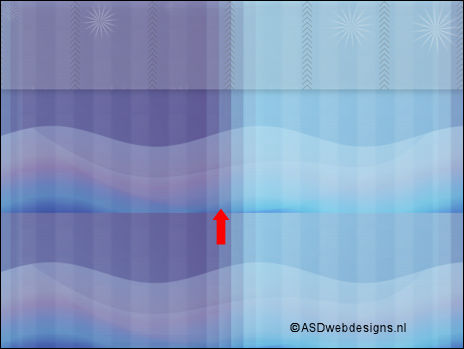
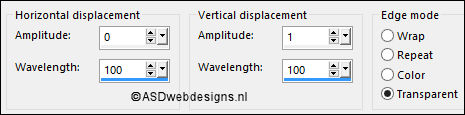
Effects - Distortion Effects -
Wave
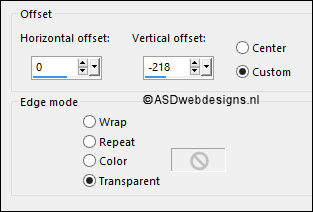
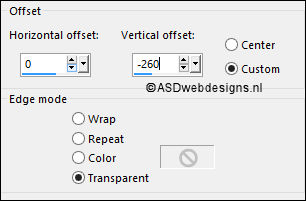
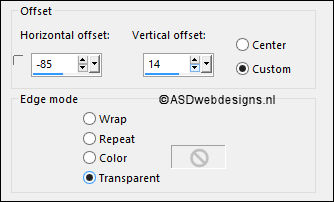
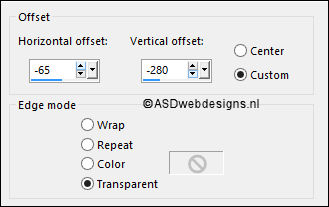
Effects - Image Effects -
Offset
Layer Palette - Double click on this Layer and set the
Blend Mode to "Hard Light" and the Layer Opacity to
40
07
Layers - Duplicate
Effects
- Geometric Effects - Spherize - Strength:
100
- Shape:
Elipse
Layer Palette - Double click on this Layer and
set the Opacity of this Layer to
24
Layers - Merge - Merge
Down
Layer Palette - Double
click on this Layer and
set the Opacity
of this Layer to
60
08
Layers - Duplicate
In order to
get the next steps right : move the
layer to the middle of the
Image
Effects - Distortion Effects -
Wave
Effects - Image Effects -
Offset
Adjust - Sharpness -
Sharpen
Layers - Merge - Merge
Down
Layer Palette - Double click on this Layer and
set the Opacity of this Layer to
92
09
Layer Palette - Click on the
Second Layer from the Bottom (Copy of
Merged)
Image - Resize - 62% -
Resize all Layers not checked
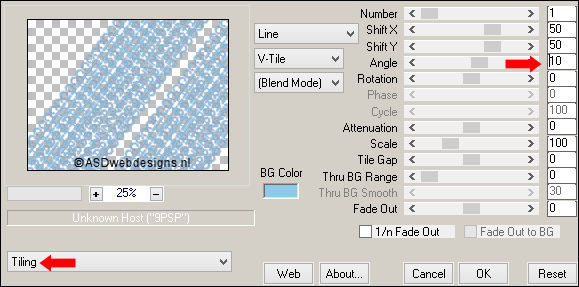
Effects - Image Effects -
Seamless Tiling - Default settings
10
Selections - Load/Save
Selection - Load Selection From Disk -
Msb_Sel_Chahrazad_01
Selections - Promote Selection to
Layer
Effects - Plugins - Adjust -
Variations - Click twice on "Darker"
Selections - Select None
Layer Palette - Double click on this Layer and set the
Blend Mode to
"Multiply"
11
Layers - Duplicate
Layer Palette - Double click on this Layer and
set the Opacity of this Layer to
55
Layers - Merge - Merge
Down
Effects - Distortion Effects -
Wave
12
Color
Palette: Change the Settings of the
Foreground Gradient - Style:
Linear
Layers - New Raster Layer
Selections - Load/Save Selection -
Load Selection From Disk -
Msb_Sel_ Chahrazad_02
Fill the
Selection with the Gradient 
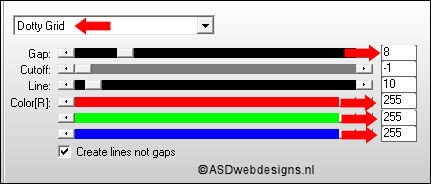
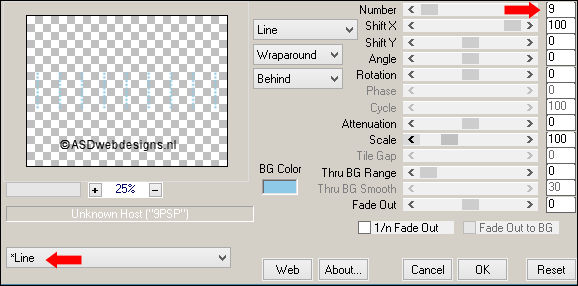
Effects - Plugins - AP [Lines]
- Lines - Silverlining
Selections - Select
None
Adjust - Hue and Saturation -
Vibrancy - Strength 70
Layer Palette - Double click on this Layer and set the
Blend Mode to
"Soft Light"
13
Maximize Tube
"lunaflores433" from
tray
Edit - Copy
On your work image: Edit - Paste
As New Layer
Image - Resize - 40% - Resize
all Layers not checked
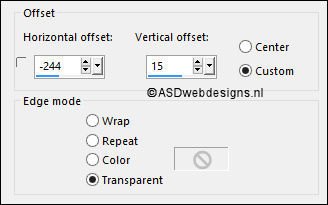
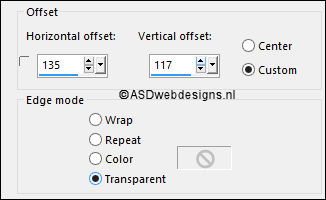
Effects - Image Effects -
Offset
Layer Palette - Double click on this Layer and set the
Blend Mode to "Dodge" and the Layer Opacity to
340
Layers - Duplicate
Layer Palette - Double click on this Layer and
set the Opacity of this Layer
to
20
Layers - Merge - Merge
Down
14
Color
Palette: Set the Foregroundcolor
back to color and change to
#ffffff 
Layers - New Raster Layer
Paint Brush Tool  - "Msb_Brush_7-5-12_01" - Size: 400
Stamp with the
Foregroundcolor in your Image like
this:
15
Layers - Duplicate
Image - Mirror -
Mirror Horizontal (
Image - Mirror in previous PSP
Versions)
Image - Mirror -
Mirror Vertical ( Image - Flip in
previous PSP Versions)
Effects - Image Effects -
Offset
Layers - Merge -
Merge Down
Layer Palette - Double click on this Layer and
set the Opacity of this Layer
to 45
16
Layer
Palette: Clcik on the Top Layer
Color Palette: Change the
Foregroudcoor to #615b98 
Pen Tool
 - Mode: Draw Lines and Poly
Lines - Create as Vector
checked - Linestyle Dot -
Width 3
- Mode: Draw Lines and Poly
Lines - Create as Vector
checked - Linestyle Dot -
Width 3
Draw a line from Left to Right
(while holding down the Shift Key of
your Key Board) like this:

Layers - Convert to Raster Layer
17
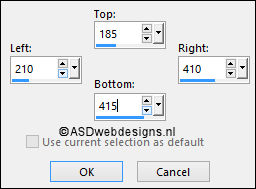
Selection Tool
- Rectangle -
Custom Selection:
Color Changer
Tool
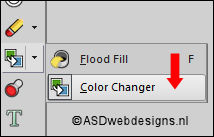
Click with the
Backgroundcolor  (Right Mouse Click)on
the Line in the Selection
(Right Mouse Click)on
the Line in the Selection
Selections - Select None
Effects - 3d Effects - Inner
Bevel
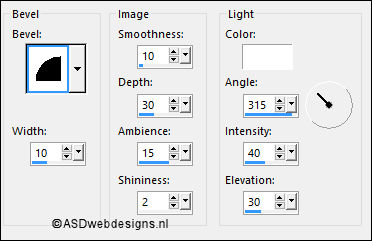
Effects - 3D
Effects - Drop Shadow - Vertical 1 -
Horizontal 1 - Opacity 60 -
Blur - 1 - Color - #000000
The Line looks like this
now:
17
Maximize Tube
"Deco
Msb_Deco_Ruitjes" from
tray
You
may need to colorize it to match your
work.
Edit - Copy
On your work image: Edit - Paste
As New Layer
Effects - Plugins -
MuRa's Meister -
Copies
Effects
- Distortion Effects - Wind - From Left checked
- Wind Strength: 100
Effects - 3D Effects - Drop
Shadow - Vertical 5 -
Horizontal 5 - Opacity 30 -
Blur - 15 - Color - #000000
Layer Palette - Double click on this Layer and set the
Blend Mode to "Screen" and the Layer Opacity to
55
18
Layers - New Raster Layer
Paint Brush Tool - "Brush
Msb_Brush_7-5-12_02" - Size: 493 -
Step: 32 - Density: 100 -
Rotation: 0 - Opacity: 80 -
Blend Mode: Normal - Continuous
checked - Wet look paint Unchecked
Stamp with the
Backroundcolor (Right Mouse Click) in
the Top Left Corner of your Image like
this:
19
Layers - Duplicate
Image - Mirror - Mirror Horizontal (
Image - Mirror in previous PSP Versions)
Layers - Merge - Merge Down
Layer Palette -
Double click on this Layer and set the Blend Mode to
"Multiply" and the Layer Opacity to
30
20
Text Tool
 Font
Emulator
- Size 36 - Units: Pixels -
Font Style: Bold - Stroke
Width 1 - Create as:
Vector
Font
Emulator
- Size 36 - Units: Pixels -
Font Style: Bold - Stroke
Width 1 - Create as:
Vector
Type
Chahrazad {space} twice

Objects - Allign -
Centre In Canvas
Layers - Convert To Raster Layer
Effects - Image Effects - Offset
Effects - Plugins - MuRa's Meister -
Copies
Effects - Plugins - MuRa's Meister -
Perspective Tiling

Image - Resize - 77% -
Resize all Layers not checked
Effects - Image
Effects - Offset
Effects - 3D Effects -
Drop Shadow - Vertical 1 -
Horizontal 1 - Opacity 60 -
Blur - 1 - Color - #000000
Adjust -
Sharpness Sharpen
21
Selection Tool -
Rectangle -
Custom Selection:
Edit - Cut (Or hit
the Delete Key of your Keyboard) 
Selections -
Select None
Layer Palette - Double click on this
Layer and set the Blend Mode to "Soft Light" and the
Layer Opacity to 35
22
Maximize Tube
"BdB-josie-27032012" from
tray
Edit - Copy
On your work image: Edit - Paste
As New Layer
Image - Resize - 85% - Resize
all Layers not checked
Image - Mirror - Mirror Horizontal (
Image - Mirror in previous PSP Versions)
Adjust - Sharpness Sharpen
Effects - Plugins - Alien
Skin Eye Candy 5 - Impact -
Perspective Shadow - Settings
Tab: Preset
Msb_Preset_PS_7-5-12
23
Image - Add Borders - Symmetric
checked - 1 px -
#615b98
Image - Add Borders - Symmetric
checked - 2 px - #ffffff
Image - Add Borders - Symmetric
checked - 1 px -
#615b98
Selections - Select
All
Selections - Modify - Contract
- 4 px
Effects - 3D Effects -
Drop Shadow - Vertical 5 -
Horizontal 5 - Opacity 30 -
Blur - 15 - Color - #000000
Repeat with the Vertical and Horizontal
Offset to Minus 5
24
Selections - Select
All
Image - Add Borders - Symmetric
checked - 50 px - #ffffff
Selections -
Invert
Maximize the Image
you have set aside in step
2
Edit - Copy
On your work Image:
Edit - Paste Into
Selection
Effects - Reflection
Effects - Kaleidoscope
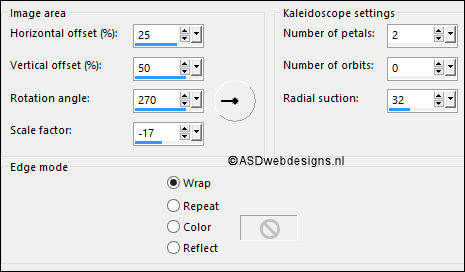
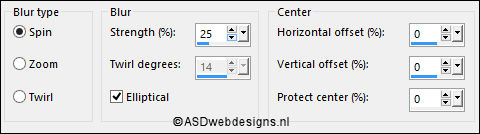
Adjust - Blur - Radial
Blur
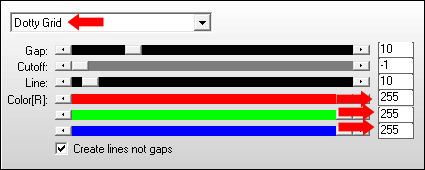
Effects - Plugins - AP [Lines]
- Lines - Silverlining
Selections - Promote Selection to Layer
Keep
selected
25
Layer Palette - Double click on this Layer and set the
Blend Mode to "Multiply" and the Layer Opacity to
40
Layers - Merge - Merge all
(Flatten)
Effects - Plugins
- Graphics Plus - Cross Shadow - Default
settings (6 x 50 & 2 x 128)
Selections -
Invert
Effects - 3D Effects -
Drop Shadow - Vertical Minus 5 -
Horizontal Minus 5 - Opacity
30 - Blur - 15 -
Color - #000000
Repeat with the Vertical and Horizontal
Offset to 5
Selections - Select None
Image - Add Borders - Symmetric
checked - 2 px - #ffffff
Image - Add Borders - Symmetric
checked - 1 px -
#615b98
26
Optional:
Image - Resize - Width
900 Pixels - Resize all Layers checked
Add your name or
watermark, save as JPG file and you're
done!
If you wish you can
post your result on my Face book Page