The tutorial:
01
Open BG Image
"Monaiekje
ag11"
Window - Duplicate (or
shift+D) - Close the original and proceed on the
copy
Layers - Duplicate
Image - Resize - 90% -
Resize all layers not
checked
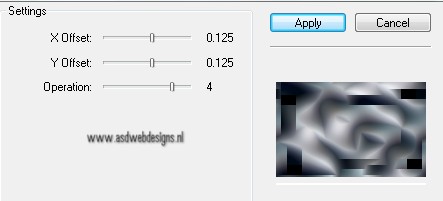
Effects - Plugins - FM Tile Tools -
Collage-Circular
Effects - Edge Effects - Enhance
02
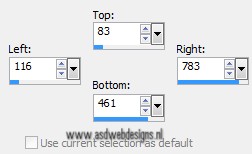
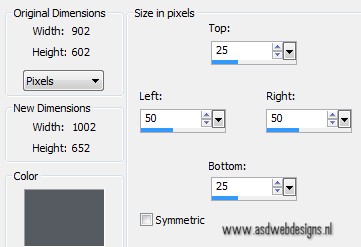
Selection Tool - Rectangle
 - Custom Selection:

Selections - Promote Selection to
Layer
Effects - Plugins - FM Tile Tools -
Collage-Linear
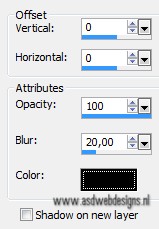
Effects 3D Effects -
DropShadow - Color: #000000 
03
Layers
- New Raster Layer
Selections - Load/Save
Selection - Load Selection From
Disk -
MDlessen-selectie85
Fill with the
Foregroundcolor 
Effects - Texture Effects - Blinds -
Color: #000000
Selections - Selection
None
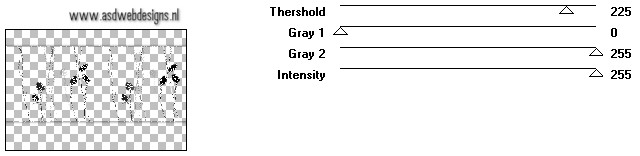
Effects - Plugins - Toadies - What
Are You? - X-dose 20 - Y-dose
20
Repeat Once!!
Layers - Arrange - Move
Down
04
Layers - Duplicate
Image - Mirror
Layers - Merge - Merge
Down
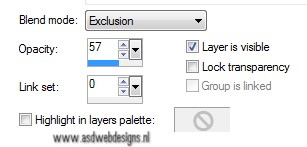
Layer Palette -
Double click on
this Layer and set the Blend Mode to
"Exclusion" and the Layer Opacity to
57
Effects - Edge Effects -
Enhance
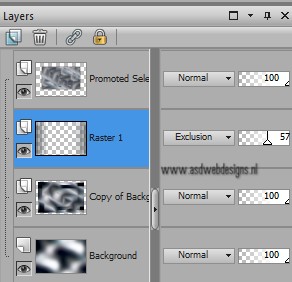
Your work and Layer Palette look
like this now:
05
Layer Palette - Click on the top
layer
Effects - Plugins - Simple - Left
Right Wrap
Layers - Duplicate
Effects - Geometric Effects - Skew
Effects - Plugins - VanDerLee
Unplugged X - TV RGB
Layers - Arrange - Move
Down
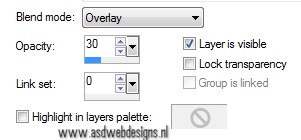
Layer Palette -
Double click on this Layer and set the Blend
Mode to "Overlay" and
the Layer Opacity to
30
06
Layer Palette - Click on the Second layer from the
Bottom
Layers - Duplicate
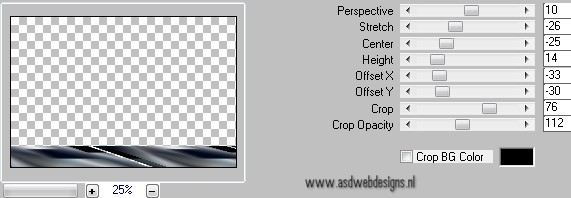
Effects - Plugins - MuRa’s Meister
- Perspective Tiling - Color
#000000
Layers - Duplicate
Image - Mirror
Layer Palette -
Double click on this Layer and set
the Layer Opacity of this layer to
50
Layers - Merge - Merge
Down
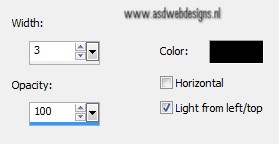
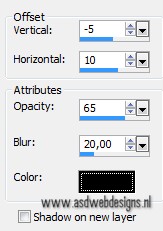
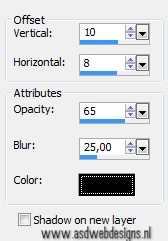
Effects 3D Effects -
DropShadow - Color: #000000
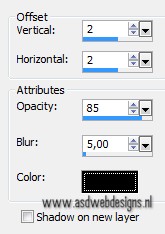
Repeat with the Vertical and Horizontal
Offset to 5 and Minus 10
07
Layer Palette - Click on the top
layer
Layers
- New Raster Layer
Selections - Load/Save Selection
- Load Selection From Disk -
MDlessen-selectie86
Open Tube "nicole-fleur2-2012"
Edit - Copy
On your work
image: Edit - Paste Into
Selection
Effects 3D Effects -
DropShadow - Color: #000000
Selections - Selection
None
Effects - Image Effects - Seamless
Tiling
Effects - Plugins - Visual
Manipulation -
Dither
Layer Palette -
Double click on this Layer and set the Blend
Mode to "Hard Light"
and the Layer Opacity to
40
Effects 3D Effects -
DropShadow - Color: #000000
08
Layer Palette - Click on the Second layer from the
top
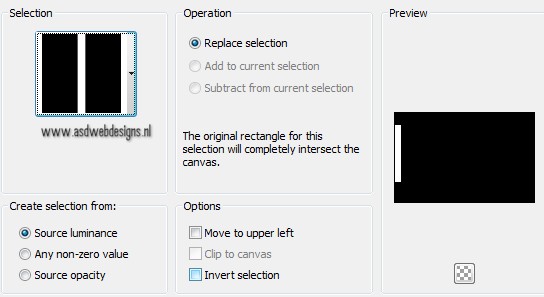
Selections - Select All
Selections - Float
Selections - Defloat
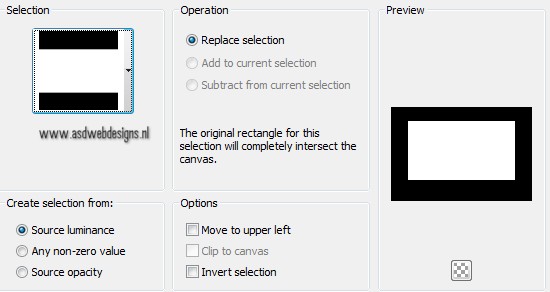
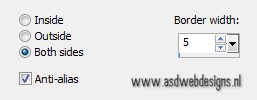
Selections - Modify - Select Selection
Borders
Fill the
Selection with the Foregroundcolor
Selections - Selection
None
Effects - Image Effects -
Seamless Tiling
Effects 3D Effects -
DropShadow - Color: #000000
Your
work and Layer Palette look
like this now:
09
Layer Palette - Click on the top
layer
Effects - Edge Effects - Enhance
10
Layer Palette - Click on the Second layer from the
bottom
Layers - New Raster
Layer
Fill with the Foregroundcolor
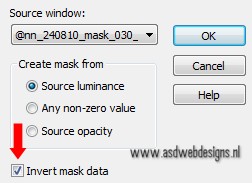
Layers - New Mask Layer - From Image
-
@nn_240810_mask_030_tdstudio
Layers - Merge - Merge Group
Effects -
Plugins - Toadies - What Are You? -
X-dose 20 - Y-dose 20
Effects - Distortion Effects - Wind - From
Left checked - Wind Strength:
100
Layer Palette -
Double click on this Layer and set
the Layer Opacity of this layer to
50
Layers - Merge - Merge all (Flatten)
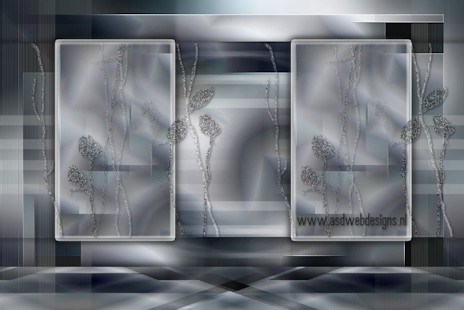
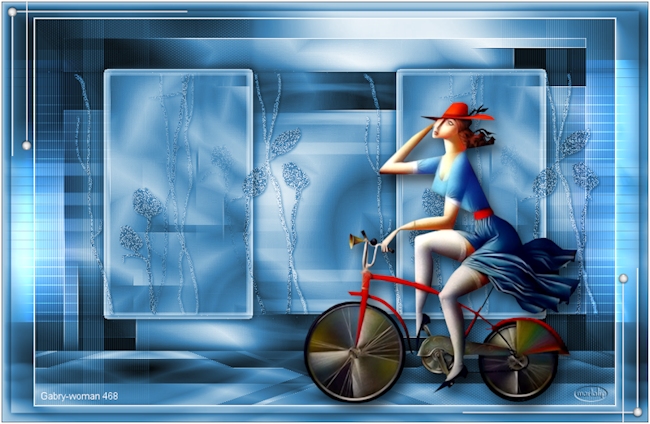
Your work looks
like this now:
11
Image - Add
Borders - Symmetric checked - 2 px -
Foregroundcolor
Edit -
Copy!
Image - Add Borders
- Symmetric not checked
-
Backgroundcolor 
Magic Wand Tool
 - Mode: Add /Shift
- Tolerance 0 - Contiguous checked -
Anti Alias Checked - Click in
the last border
- Mode: Add /Shift
- Tolerance 0 - Contiguous checked -
Anti Alias Checked - Click in
the last border
Edit - Paste
into Selection
Selections - Promote Selection to
Layer
Selections -
Invert
Effects 3D Effects -
DropShadow - Color: #000000
Selections -
Invert
Effects - Plugins - AAA frames -
Foto Frame
Selections - Select All
Selections - Modify - Contract - 15
px
Effects 3D Effects -
DropShadow - Color: #000000
Image - Add
Borders - Symmetric checked - 1 px -
Foregroundcolor
Selections - Selection
None
12
Open Tube "Tocha23813"
Edit - Copy
On your work image: Edit -
Paste
as New Layer
Image - Resize -
85% - Resize all layers not
checked
Effects - Image Effects -
Offset
Effects 3D Effects -
DropShadow - Color: #000000
13
Layer Palette - Click on the Bottom
layer
Selections - Load/Save Selection
- Load Selection From Disk -
MDlessen-selectie87
Selections - Promote Selection to
Layer
Effects 3D Effects -
DropShadow - Color:
#000000
Effects - Plugins -
L en K
landksiteofwonders -L en K's
Mayra
Selections - Selection
None
Effects - Distortion Effects - Wind - From
Left checked - Wind Strength: 100
Repeat Once!
14
Layers -
Duplicate
Image - Mirror
Layers - Merge - Merge
Down
Layer Palette -
Double click on this Layer and set the Blend
Mode to
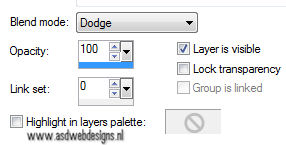
"Dodge"
15
Open Tube "Monaiekje
deco 10"
Edit - Copy
On your work image: Edit -
Paste
as New Layer
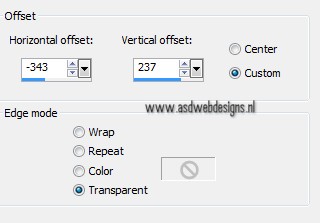
Effects - Image Effects -
Offset
16
Layers - Duplicate
Image - Mirror
Image -
Flip
17
Image - Add Borders - Symmetric
checked - 1 px - Foregroundcolor
Add your name or
watermark, save as JPG file and you're done!
If you wish you can post
your result on my Facebook Page

Attention
you can also send your result to Monaiekje, she will place it on
her site HERE
But only if your work is resized to 900 PX Width
Email
monaiekje.design@gmail.com
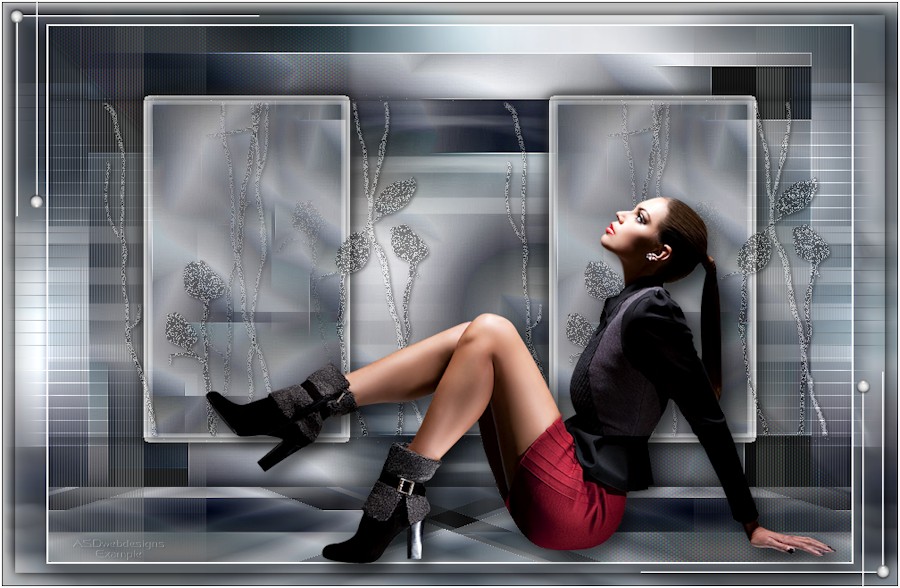
Extra Example: Tube by Annelies from
A&K Tubes unlimited. She shares her great
tubes
HERE