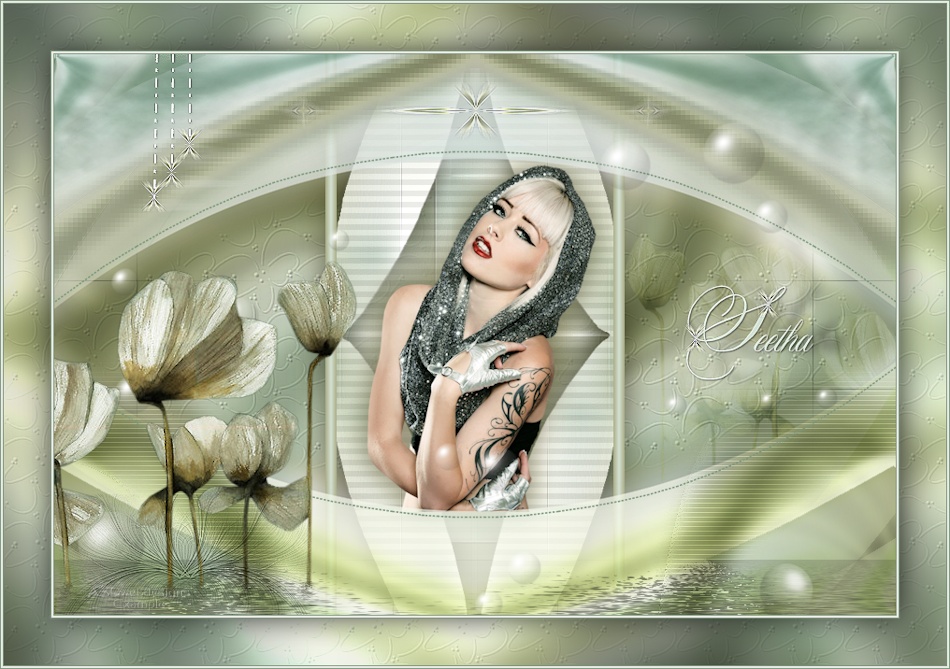
Open a new transparent
image of 900 x 600 px
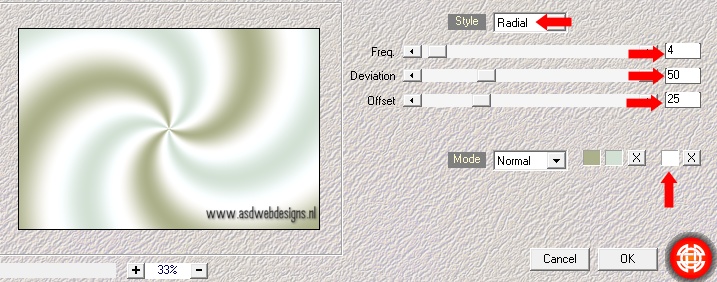
Effects - Plugins - Mehdi - Wavy
Lab - Change the third color to
#ffffff  , the other colors will
be filled automatically
, the other colors will
be filled automatically
02
Layers -
Duplicate
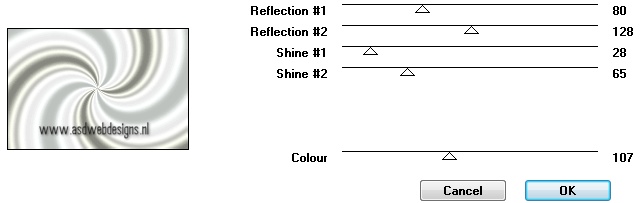
Effects -
Plugins - Toadies -
Metalwork
Effects - Image Effects -
Seamless Tiling
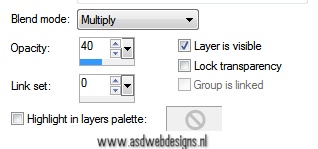
Layer
Palette - Double click on this
Layer and set the Blend Mode
to "Multiply" and the Layer
Opacity to 40
03
Layers -
Duplicate
Effects - Plugins - <I.C.NET
Software> Filters
Unlimited - Toadies -
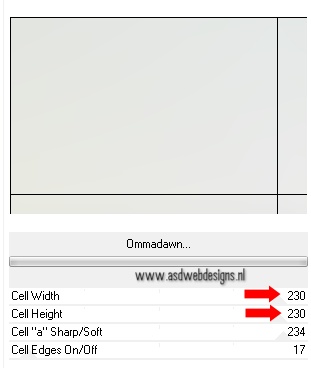
Ommadawn
Layers - Duplicate
Image - Mirror
Image - Flip
Layers - Merge
- Merge Down
Effects - Image Effects -
Seamless Tiling
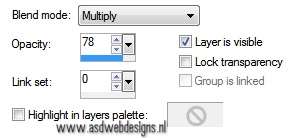
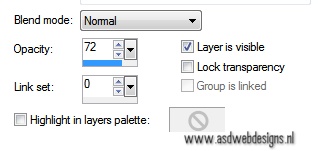
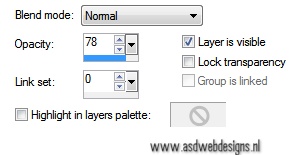
Layer Palette - Double click on
this Layer and set the Layer
Opacity to 78
Layers - Merge -
Merge Visible
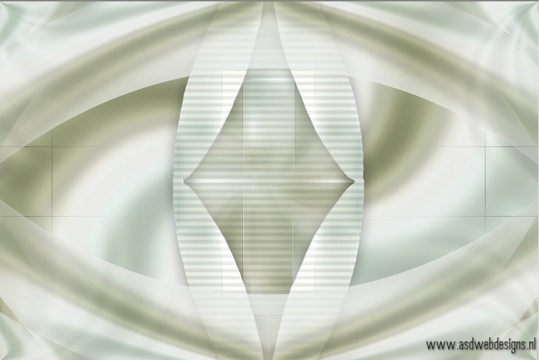
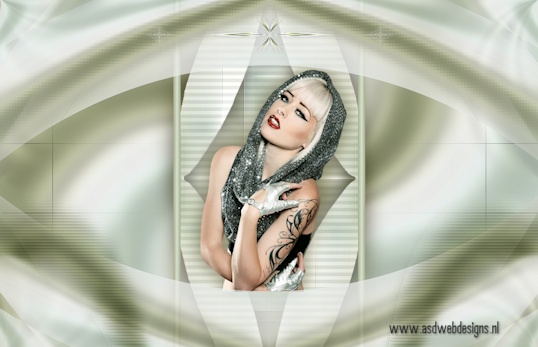
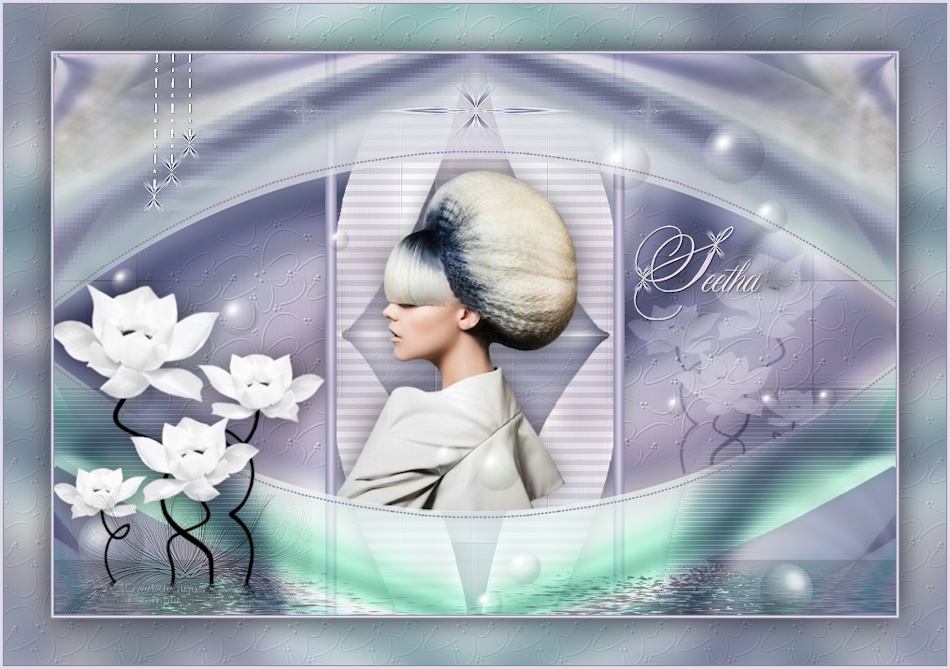
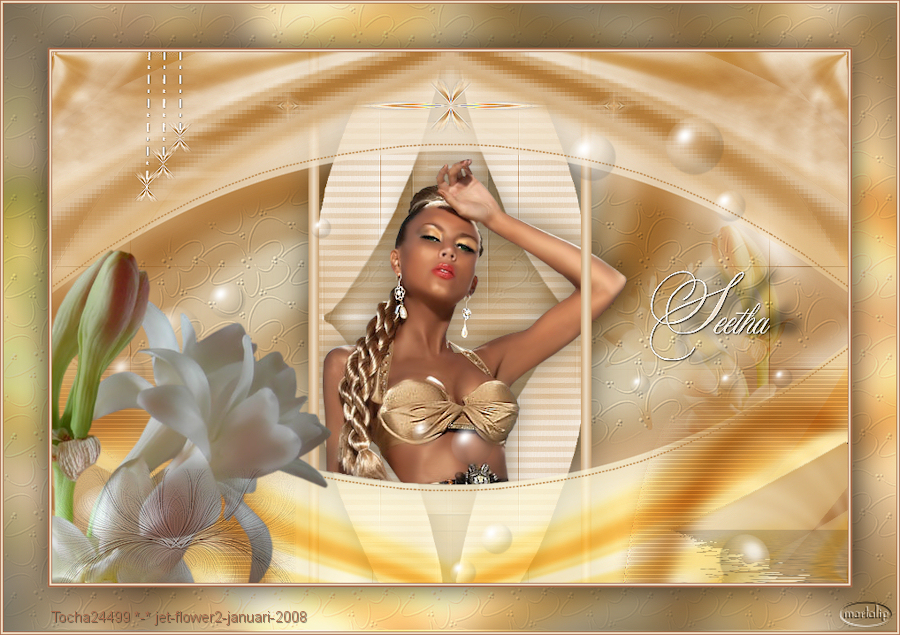
Your work looks like this
now:
04
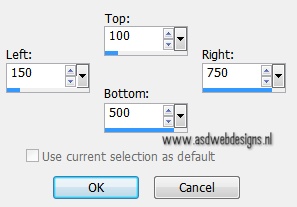
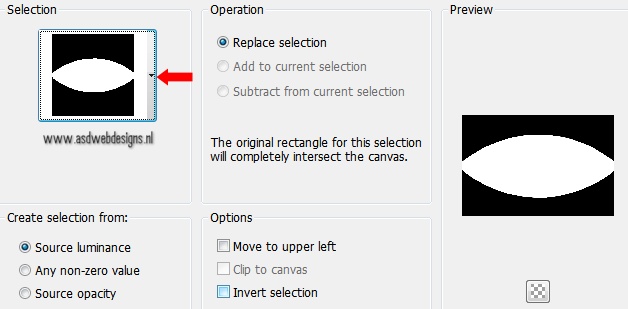
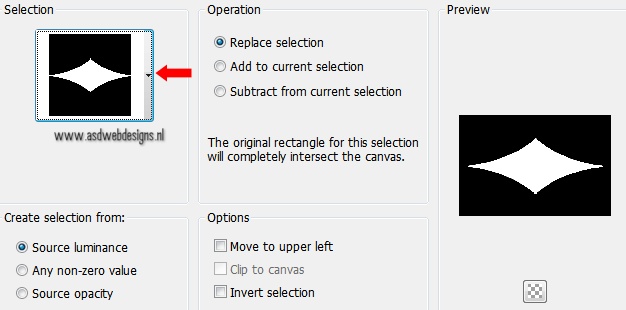
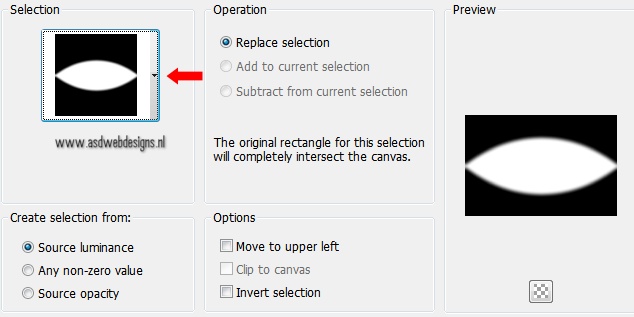
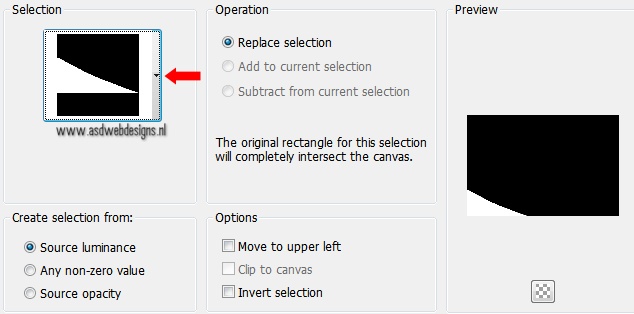
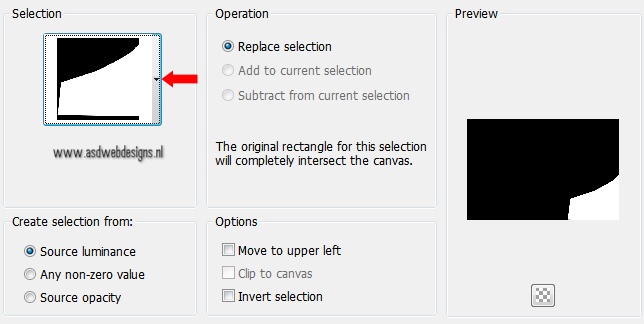
Selection Tool - Rectangle
 - Custom
Selection:
- Custom
Selection: 
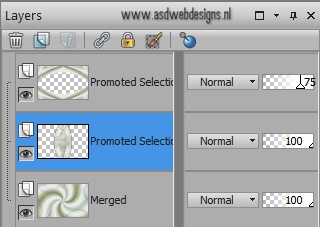
Selections - Promote
Selection to Layer
Selections - Select None
Effects - Image Effects -
Seamless Tiling
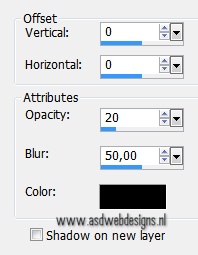
Effects 3D Effects -
DropShadow - Color:
#000000 
Effects - Distortion
Effects - Warp
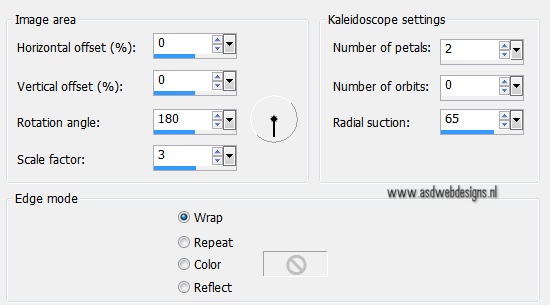
Effects - Plugins - <I.C.NET Software>
Filters Unlimited - &Bkg Kaleidoscope>
- 4 QFlip ZbottomL
Layer Palette - Double click on
this Layer and set the Layer
Opacity of this Layer to
75
05
Layer Palette
- Click on the Bottom
Layer
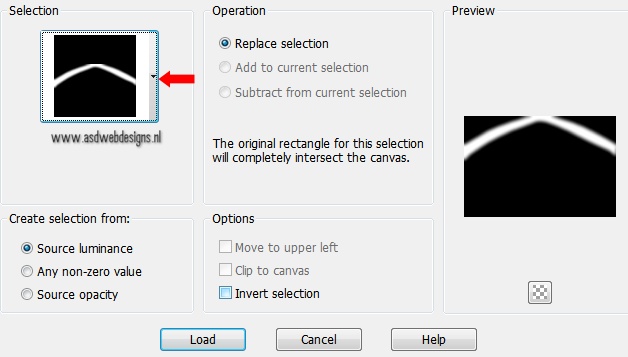
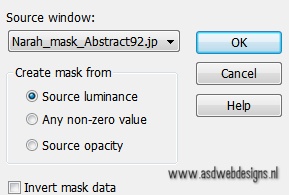
Selections -
Load/Save Selection - Load
Selection From Disk -
Msb_Sel_Seetha_01
Selections - Promote
Selection to Layer
Adjust - Blur - Gaussian Blur -
15
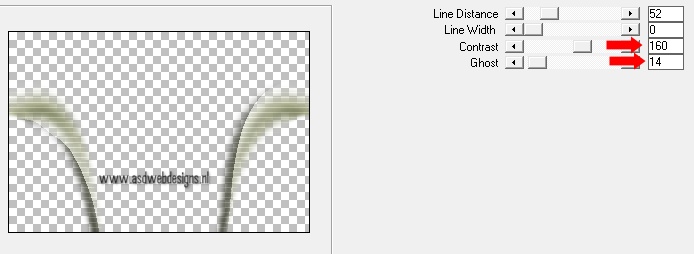
Effects -
Plugins - Mehdi -
Weaver
Effects - Edge Effects -
Enhance More
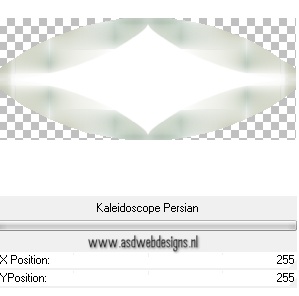
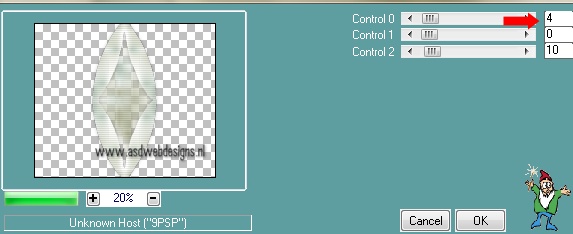
Effects -
Plugins - <I.C.NET Software>
Filters Unlimited - &Bkg Kaleidoscope>
-
Kaleidoscope Persian
Selections -
Load/Save Selection - Load
Selection From Disk -
Msb_Sel_Seetha_02
Edit - Cut (Or hit the Delete
Key of your Keyboard)
Keep Selected
06
Layer Palette - Click
on the Bottom Layer
Selections - Promote
Selection to Layer
Adjust - Blur - Gaussian Blur -
15
Effects - Plugins - Mehdi
- Weaver
Selections - Select None
Effects - Edge Effects -
Enhance More
07
Layer Palette - Click on the
Second Layer from the
Top
Effects 3D
Effects - DropShadow -
Color:#000000
Layers - Merge - Merge
Down
Image - Free
Rotate - Right checked -
90°
Image -
Resize - 85% - Resize all
Layers not checked
Effects - Plugins - Carolaine and
Sensibility -
CS-HLines
Effects 3D Effects -
DropShadow - Color:#000000
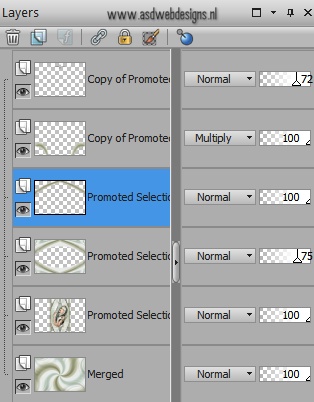
Your work and Layer Palette
look like this now:
08
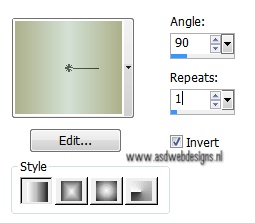
Color Palette: Set your
Foregroundcolor to Foreground/Background
Gradient (Corel_06_029) - Style
Linear
Layers - New Raster Layer
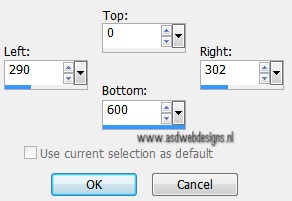
Selection Tool -
Rectangle - Custom
Selection:
Fill the Selection with
the Gradient 
Selections - Select None
09
Layers - Duplicate
Image - Mirror
Layers - Merge - Merge Down
Open Tube "Alies
1VR468-woman-09052013"
Edit - Copy
On your work image:
Edit - Paste As New
Layer
Image - Resize
- 50%- Resize all Layers not
checked
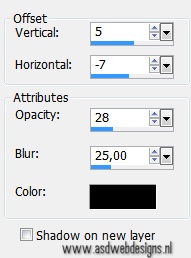
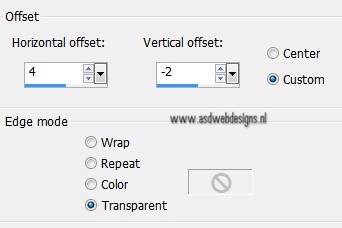
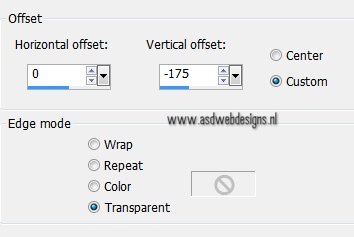
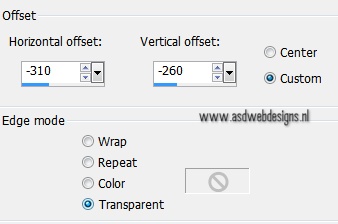
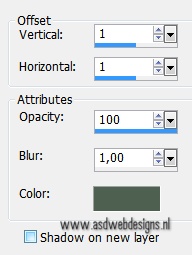
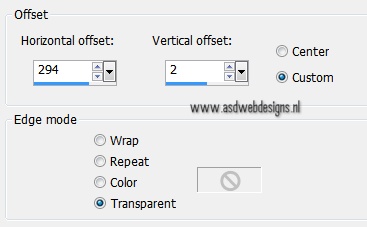
Effects - Image Effects -
Offset
Note:
You might need to adjust this
setting when using your own tube
Layers - Arrange - Move Down
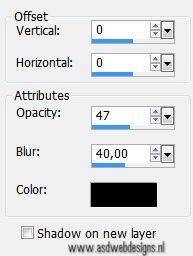
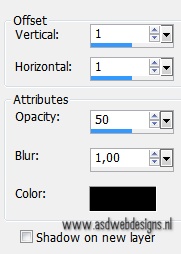
Effects 3D Effects -
DropShadow - Color: #000000
11
Layer Palette - Click
on the Second Layer from the Top
Layers - Merge - Merge Down
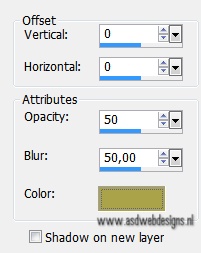
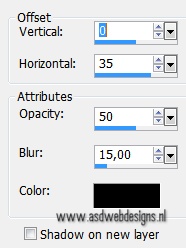
Effects 3D Effects -
DropShadow - Color: #aba349

Layers - Merge - Merge Down
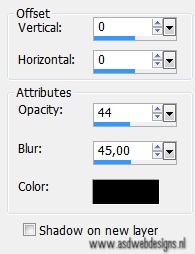
Effects 3D Effects -
DropShadow - Color: #000000
Your
work and Layer Palette look like
this now:
12
Layer Palette -
Click on the top Layer
Selections - Load/Save
Selection - Load Selection From
Disk -
Msb_Sel_Seetha_03
Selections - Promote
Selection to Layer
Selections - Select None
Layers - Duplicate
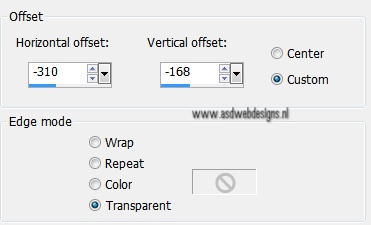
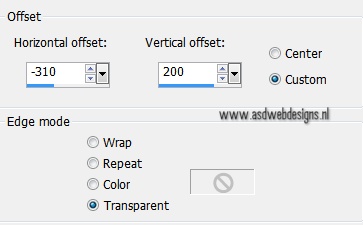
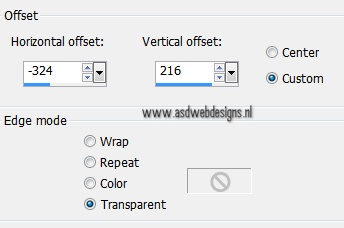
Effects - Image Effects -
Offset
Effects - Reflection Effects -
Kaleidoscope
Image - Resize - 50%- Resize all
Layers not checked
Effects - Image Effects -
Offset
Effects - Edge Effects -
Enhance More
Layer Palette
- Double click on this Layer and
set the Layer Opacity to
72%.
13
Layer Palette - Click
on the Second Layer from the Top
Layers - Duplicate
Effects - Image Effects -
Offset
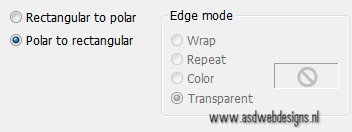
Effects - Distortion
Effects - Polar
Coordinates
Adjust - Blur - Gaussian Blur -
5
Effects - Plugins -
Carolaine and Sensibility -
Cs-texture
Selections - Select All
Effects - Image Effects -
Offset
Adjust - Sharpness - Sharpen
Image - Crop To Selection
Layer Palette - Double click on
this Layer and set the Blend Mode to
"Multiply"
Layer Palette - Click on the Third
Layer from the Top
Effects - Distortion
Effects - Pixelate
Adjust - Sharpness - Sharpen
Your work and Layer Palette look
like this now:
14
Open Tube "Msb_Deco_5-7-13"
Edit - Copy
On your work image: Edit -
Paste As New Layer
Layers - Arrange - Bring to
Top
Effects 3D
Effects - DropShadow - Color:
#000000
15
Layer Palette - Click on the Bottom
Layer
Layers - New Raster
Layer
Selections - Load/Save
Selection - Load Selection From
Disk -
Msb_Sel_Seetha_04
Fill the Selection with the Gradient
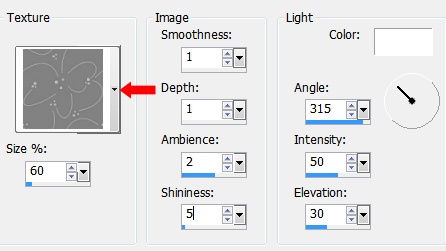
Effects - Texture Effects - Texture
- wood-jet
Selections - Select None
Adjust - Sharpness -
Sharpen More
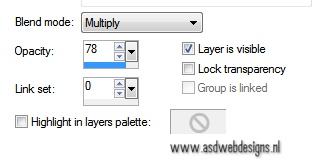
Layer
Palette - Double click on this Layer
and set the Blend Mode to "Multiply"
and the Layer Opacity to
78
Effects 3D Effects -
DropShadow - Color:
#aba349
Color Palette: Change your
Foreground/Background Gradient
(Corel_06_029) to Style
Sunburst
Layer Palette -
Click on the top Layer
Layers - New Raster Layer
Selections - Load/Save Selection
- Load Selection From Disk -
Msb_Sel_Seetha_05
Fill the Selection with the Gradient

Selections - Select None
17
Layers - Duplicate
Image - Mirror
Layers - Merge - Merge
Down
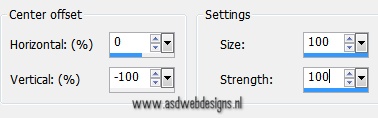
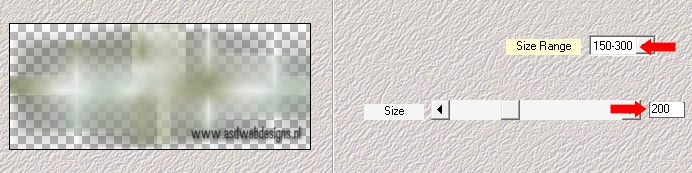
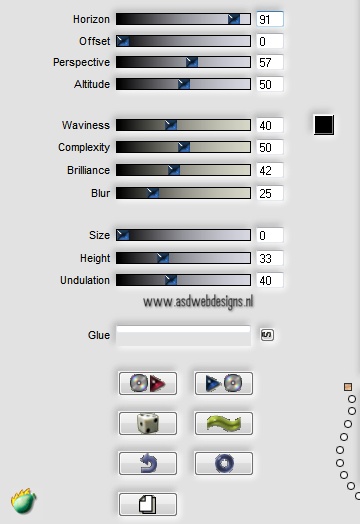
Effects - Plugins -
Flaming Pear - Flood -
Click on the Red Arrow  and load Preset
Msb_Preset_FP_FL_20-7-13
and load Preset
Msb_Preset_FP_FL_20-7-13
Or if
this is not working for you use
these settings:
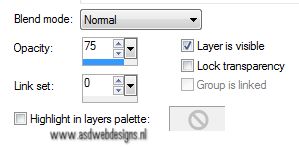
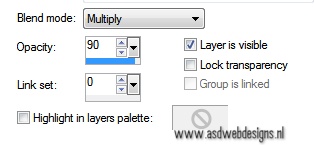
Layer Palette - Double click on
this Layer and set the Blend Mode to
"Multiply" and the Layer
Opacity to 90
18
Open Tube "Msb_Deco_5-7-13_01"
Edit - Copy
On your work image: Edit -
Paste As New Layer
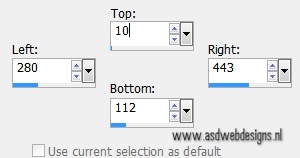
Selection Tool - Rectangle
- Custom Selection:
Edit - Cut
Selections - Select None
Edit - Paste As New Layer
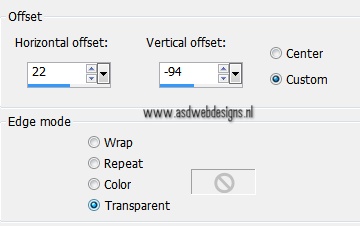
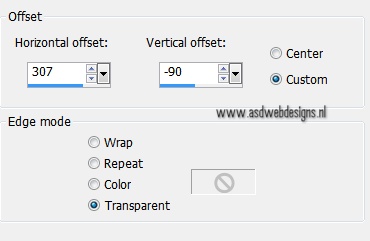
Effects -
Image Effects - Offset
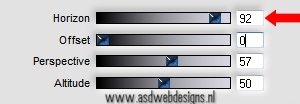
Effects - Plugins - Flaming Pear -
Flood - Same Settings but
change the Horizon to
92
19
Layers - Duplicate
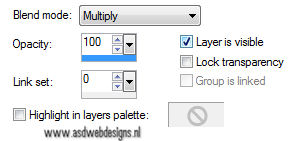
Layer Palette - Double click on
this Layer and set the Blend Mode to
"Multiply" - and the Layer
Opacity to 90
Layers - Merge - Merge Down
Layers - Duplicate
Image - Mirror
Image - Resize - 80%- Resize all
Layers not checked
Effects - Image Effects -
Offset
Layers - Merge - Merge
Down
Effects 3D
Effects - DropShadow -
Color: #000000
Layer
Palette - Double click on this Layer
and set the Layer Opacity to
78
Open Tube "Betsie
26-2012"
Edit - Copy
Minimize to Tray, You need it again
later
On your work image:
Edit - Paste As New Layer
Image - Resize - 65%- Resize
all Layers not checked
Layers - Arrange - Move Down
Effects - Image Effects -
Offset
Adjust - Sharpness - Sharpen
Effects 3D Effects -
DropShadow - Color:
#aba349
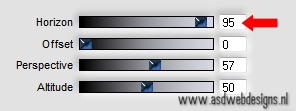
Effects - Plugins - Flaming Pear -
Flood - Same Settings but
change the Horizon to
95
22
Layer Palette:
Click on the Top Layer
Open Tube "Msb_Deco_5-7-13_02"
Edit - Copy
On your work image:
Edit - Paste As New Layer
Effects - Image Effects -
Offset
23
Layers - Duplicate
Image - Mirror
Layers - Merge - Merge
Down
Layer Palette -
Double click on this Layer
and set the Layer Opacity of
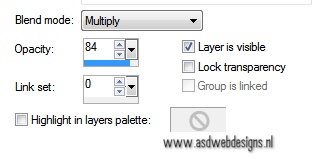
this Layer to84
24
Maximize Tube "Betsie
26-2012" from tray
Edit - Copy
Minimize to Tray, You need it again
later
On your work image: Edit -
Paste As New Layer
Image -
Mirror
Image - Resize - 80%- Resize all
Layers not checked
Effects -
Image Effects - Offset
Selections - Load/Save Selection
- Load Selection From Disk -
Msb_Sel_Seetha_06
Edit - Cut (Or hit the Delete Key of
your Keyboard)
Selections - Select None
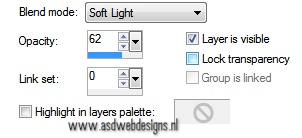
Layer Palette - Double click on
this Layer and set the Blend Mode to
"Soft Light" and the Layer
Opacity to 62%.
25
Open Tube
"Msb_Text_Seetha"
Edit - Copy
On your work image: Edit -
Paste As New Layer
Effects - Image Effects -
Offset
Adjust - Sharpness - Sharpen
Effects 3D Effects -
DropShadow - Color: #000000
Effects 3D Effects -
DropShadow - Color: #000000
26
Open Tube "Deco_5-7-13_04"
Edit - Copy
On your work image: Edit -
Paste As New Layer
Effects - Image Effects -
Offset
Adjust - Sharpness - Sharpen
27
Layers - Duplicate
Effects - Distortion Effects - Wind
- From Left checked - Wind Strength:
100
Edit - Repeat
wind
Adjust - Sharpness -
Sharpen
Layers - Arrange -
Move Down
28
Layer Palette - Click on the 4th
Layer from the Bottom
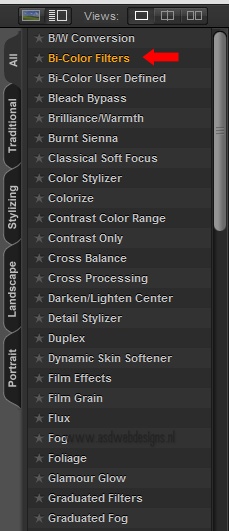
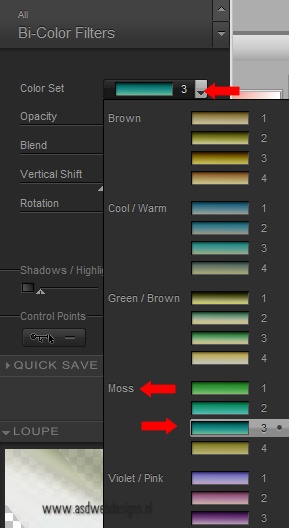
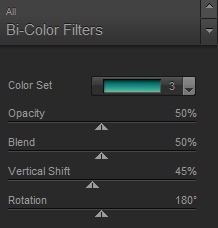
Effects - Plugins - Nik Software - Color Efex
Pro 3.0 - Bi Color Filters -
Moss - Color Set
3
Note:
If you are using other colors
pick one to match
Layers - Merge -
Merge All (Flatten)
Edit
- Copy!
30
Color
Palette: Set our foregroundcolor
#79967b
 and your
Backgroundcolor to
#ecebe7
and your
Backgroundcolor to
#ecebe7 
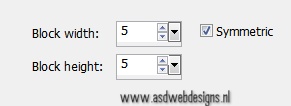
Image - Add Borders - Symmetric
checked - 1 px - Foregroundcolor
Image -
Add Borders - Symmetric checked - 2 px -
Backgroundcolor
Image - Add Borders -
Symmetric checked - 1 px -
Foregroundcolor
Selections
- Select All
Image -
Add Borders - Symmetric checked - 50 px -
Backgroundcolor
Selections - Invert
Edit - Paste Into Selection (Image
is still in your PSP memory)
Adjust - Blur -
Gaussian Blur - 15
31
Selections - Promote
Selection to Layer
Image - Flip
Effects - Texture Effects - Texture
- wood-jet
Selections - Select
None
Adjust - Sharpness -
Sharpen
Effects - Plugins - Graphics
Plus - Cross Shadow
Layer Palette - Double click on this
Layer and set the Layer Opacity of
this Layer to 60
32
On this Layer:
Magic Wand Tool  - Mode: Add /Shift -
Tolerance 0 - Contiguous checked -
Anti Alias Checked - Click in
the middle of your image ( in the
transparent part of this layer)
- Mode: Add /Shift -
Tolerance 0 - Contiguous checked -
Anti Alias Checked - Click in
the middle of your image ( in the
transparent part of this layer)
Layers - Merge -
Merge All (Flatten)
ffects 3D Effects - DropShadow
- Color: #000000
Selections - Select None
33
Image - Add Borders - Symmetric
checked - 1 px - Foregroundcolor
Image - Add Borders - Symmetric
checked - 2 px - Backgroundcolor
Image - Add Borders - Symmetric
checked - 1 px - Foregroundcolor
34
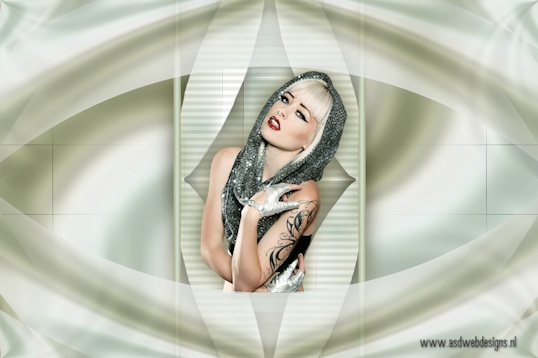
Image - Resize - Width 950 Pixels
- Resize all Layers checked
Add your name or
watermark, save as JPG file and
you're done!
If you
wish you can post your result on my
Facebook Page