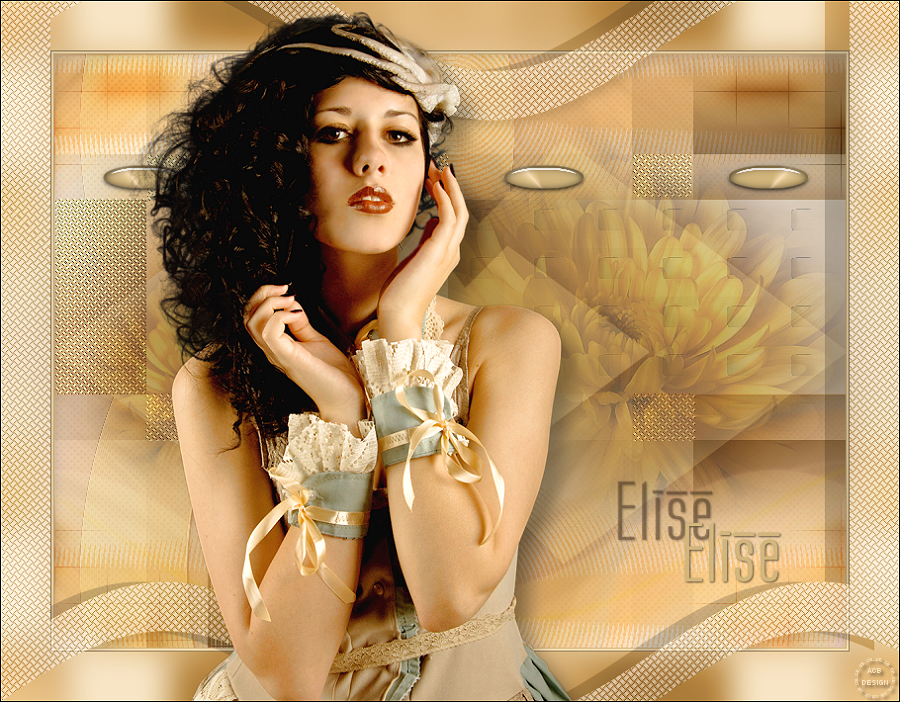
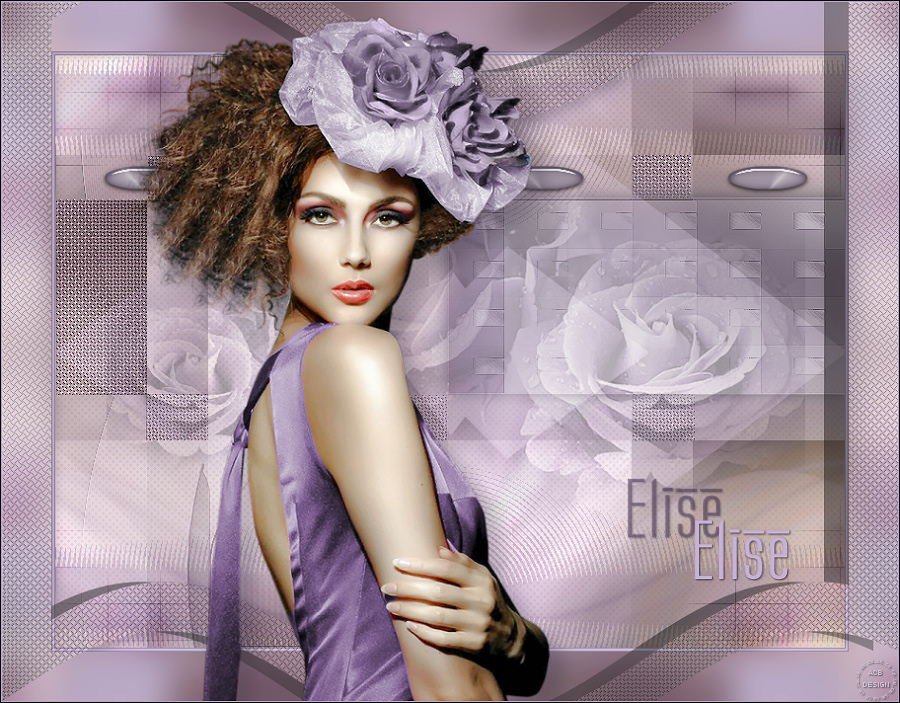
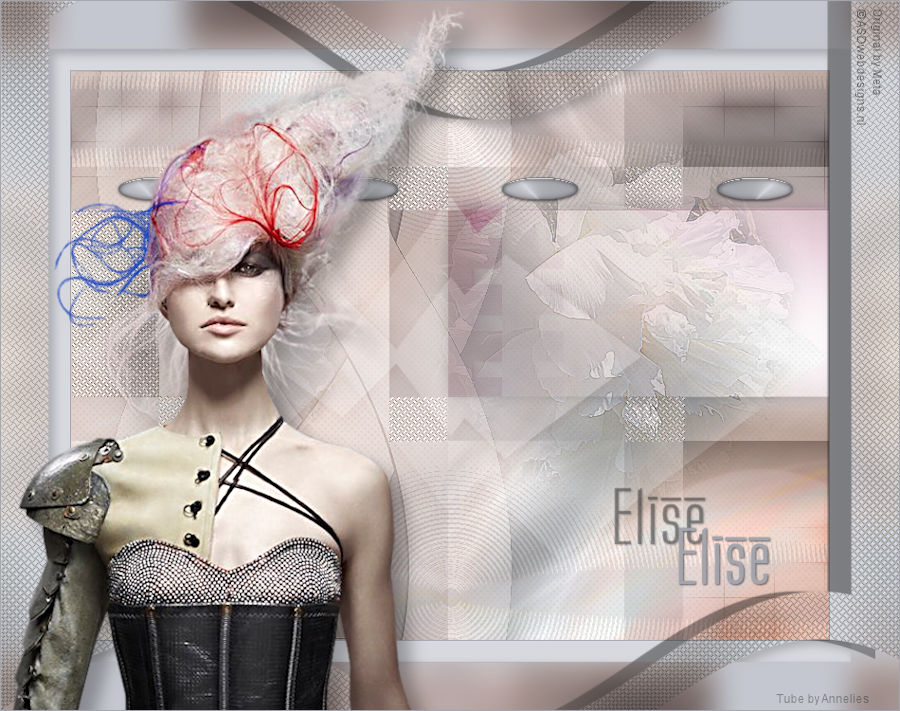
The tutorial:
01
Open a new
transparent image of 800 x 600 px
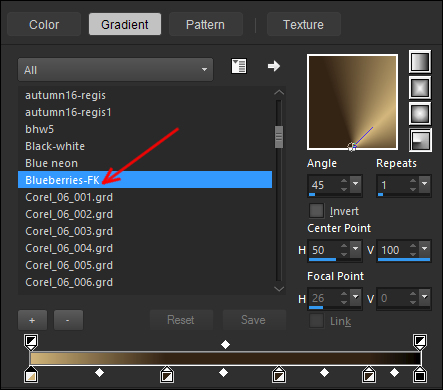
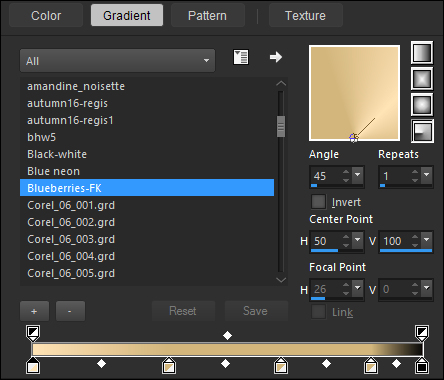
 Fill the Layer
with the Gradient
Fill the Layer
with the Gradient

02
Selections - Select All
Maximize "kittys-Danniella"
from tray
Edit - Copy
On your work image: Edit -
Paste - Paste Into
Selection
Selections - Select
None
03
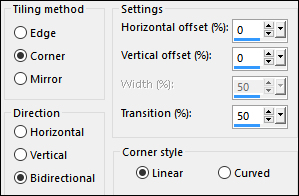
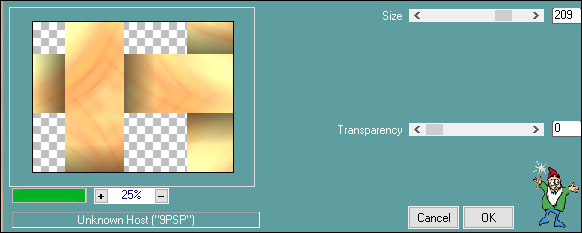
Effects - Image Effects - Seamless
Tiling - Default settings
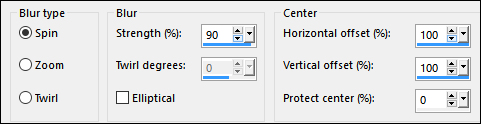
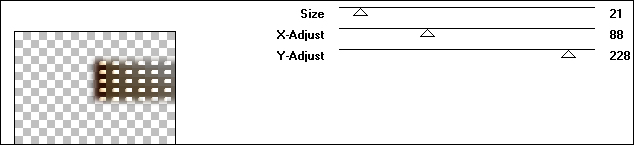
Adjust - Blur - Radial Blur
04
Layers - Duplicate
Effects - Plugins - Filters Unlimited
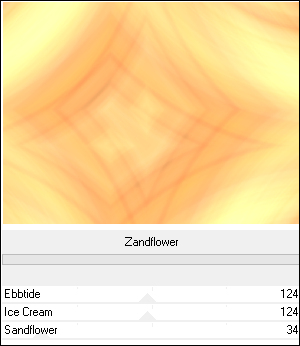
2.0 - &<Bkg Kaleidoscope>
- Zandflower
Layer Palette: Change
the Bend Mode of this Layer to
Luminance(Legacy)
05
Layers - Duplicate
Effects - Plugins - Photohopfun II -
Kylie
Effects - Plugins - Toadies - What Are
You?
06
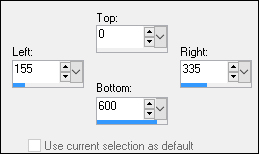
Selection Tool (S) - Custom
Selection 
Selections - Promote Selection to
Layer
Adjust - Hue and Saturation -
Colorize

Layers - Duplicate
Seletions Select
None
07
Layer Palette: Click on the second
Layer from the Top (Promoted
Selection)
Adjust - Blur - Gaussian Blur -
Radius: 15
Layer Palette: Click on the Top
Layer (Copy of Promoted
Selection)
Effects - Plugins - VM Extravaganza -
Picture in a Picture
Adjust - Sharpness - Sharpen
Adjust - Hue and Saturation -
Colorize
Layer Palette: Change the Blend
Mode of this Layer to Multiply
and lower the Opacity to
50
Effects - 3D Effects - Drop
Shadow V:
0 H: 0
Opacity: 35 Blur:
20 Color: #000000
08
Layer Palette: Click on the third
Layer from the Top (Copy 2 of
Raster 1)
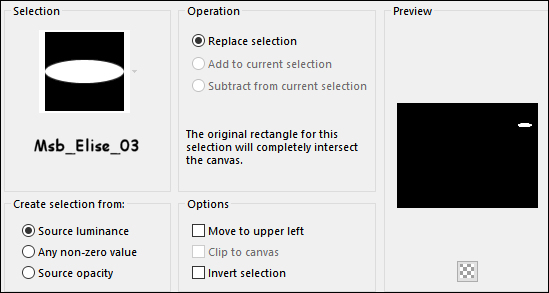
Selections - Load/Save - Load
Selection From Disk -
"Msb_Elise_01"
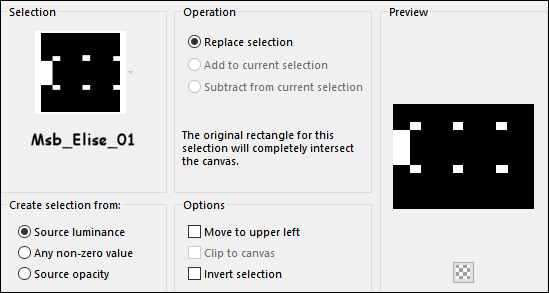
Selections - Promote Selection to
Layer
Selections - Select
None
09
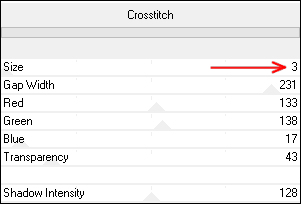
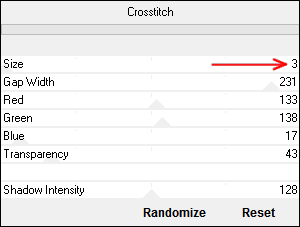
Effects - Plugins - Filters Unlimited
2.0 - &<Bkg Designer sf10 I -
Crosstitch
Selections - Select All
Selections - Float
Selections - Defloat
Selections - Invert
Edit - Cut (Or hit Delete on your
keyboard)
Selections - Select
None
10
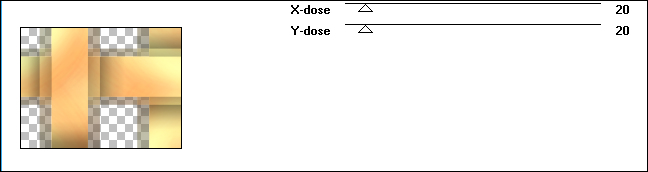
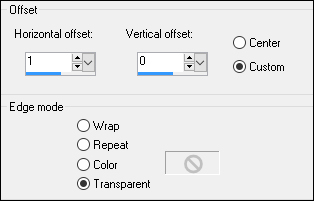
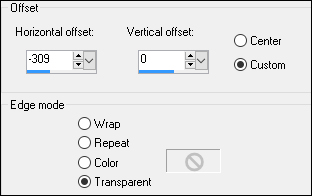
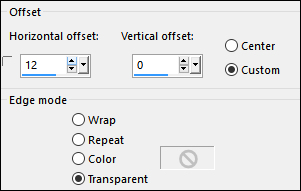
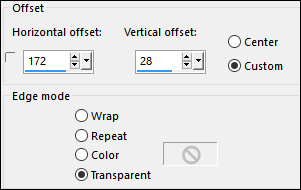
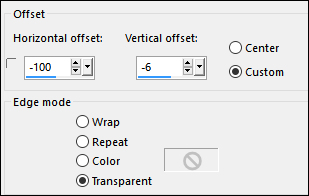
Effects - Image Effects - Offset
Layers - Duplicate
Layer Palette: Change the Blend
Mode of this Layer to
Multiply and lower the Opacity
to 55
Layers - Merge - Merge
Down
11
Layer Palette: Click on the fourth Layer
from the Top (Copy 2 of Raster 1)
Selection Tool (S) - Custom
Selection
Selections - Promote Selection to
Layer
Effects - Plugins - Filters Unlimited
2.0 - &<Bkg Designer sf10
II> - Flutter - Default settings
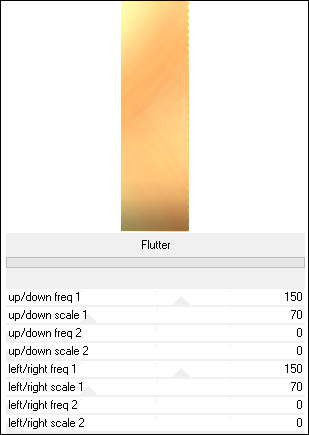
Keep selected
12
Materials Palette: Change the
Foreground Gradient back to Color

Layers - New Raster Layer
Fill the Layer with
the Foregroundcolor
Selections - Modify - Contract -
2px
Edit - Cut (Or hit Delete on your
keyboard)
Selections - Select None
Layers - Merge - Merge Down
Effects- Distortion Effects -
Warp
13
Layers - Duplicate
Image - Mirror - Mirror Horizontal
Effects - Image Effects - Offset
Layers - Merge - Merge
Down
14
Layers - Duplicate
Image - Mirror - Mirror Vertical
Layers - Merge - Merge Down
Layer Palette: Change the Blend
Mode of this Layer to Soft Light
and lower the Opacity to
75
Effects - 3D Effects - Drop
Shadow V:
5 H: 5
Opacity: 30 Blur:
15 Color: #000000
Effects - Edge Effects -
Enhance
15
Materials Palette: Change the
Backgroundcolor to #ffe4b7

Layer Palette: Click on the Top
Layer
Layers - New Raster Layer
Selections - Load/Save - Load
Selection From Disk -
"Msb_Elise_02"
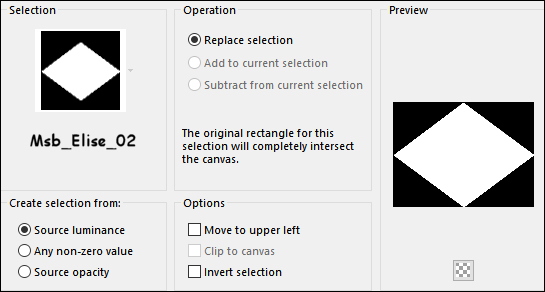
Fill the Selection
with the Backgroundcolor
Selections - Select
None
16
Effects - Plugins - Filters Unlimited
2.0 - &<Bkg Kaleidoscope>
- @BlueBerry Pie

Layer Palette: Change the Blend
Mode of this Layer to Soft Light
and lower the Opacity to
60
Layers - Duplicate
Image - Resize - 50% - Resize All
Layers - not
checked
Effects - 3D Effects - Drop
Shadow V:
5 H: 5
Opacity: 30 Blur:
15 Color: #000000
17
Layer Palette: Click on the second
Layer from the Top (Raster
2)
Selections - Select All
Selections - Float
Selections - Defloat
Layer Palette: Click on the fourth
Layer from the Bottom (Promoted
Selection 2 )
Edit - Cut (Or hit Delete on
your keyboard)
Selections - Select
None
18
Layer Palette: Click on the Top
Layer (Copy of Raster 2)
Layers - New Raster Layer
Selection Tool (S) - Custom
Selection
Fill the Selection
with the Backgroundcolor
Selections - Select
None
19
Effects - Distortion Effects -
Ripple
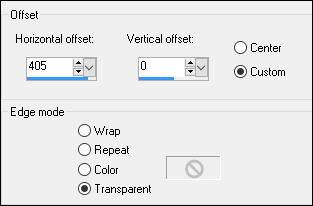
Effects - Image Effects - Offset
Layers - Duplicate
Image - Mirror - Mirror Vertical
Layers - Merge - Merge Down
Layer Palette: Change
the Blend Mode of this Layer to
Multiply and lower the
Opacity to 68
20
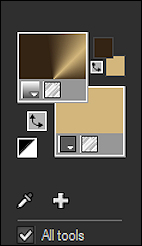
Materials Palette: Change
the Foregroundcolor to #d3b77d

Background is still #ffe4b7
Change the Foregroundcolor to
Gradient with the same settings as
before
21
Layers - New Raster Layer
Selections - Load/Save - Load
Selection From Disk -
"Msb_Elise_03"
Fill the Selection
with the Gradient 
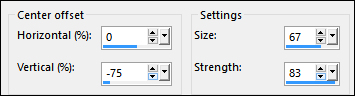
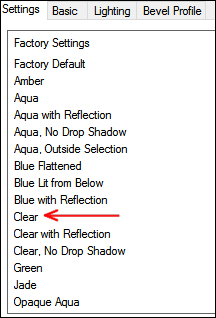
Effects - Plugins - Alien Skin - Ey
Candy 5 - Impact- Glass - Preset
Clear
Selections - Select
None
22
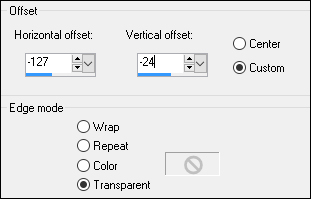
Layers - Duplicate
Image - Mirror - Mirror Horizontal
Effects - Image Effects - Offset
Layers - Duplicate
Effects - Image Effects - Offset
23
Layers - Duplicate
Image - Mirror - Mirror Horizontal
Layers - Merge - Merge Down
Edit - Repeat Layer Merge Down
(Twice)
Layers - New Raster Layer
Selection Tool (S) - Custom
Selection

Fill the Selection
with the Backgroundcolor
Selections - Select
None
24
Effects - Distortion Effects -
Wave

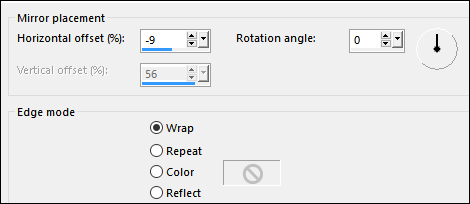
Effects - Reflection Effects -
Rotating Mirror
25
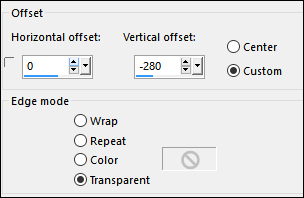
Effects - Image Effects - Offset
Layer Palette: Change the Blend
Mode of this Layer to Soft Light
and lower the opacity to
46
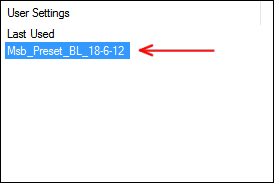
Effects - Plugins - Alien Skin Eye
Candy 5 - Impact - Backlight -
Preset - "Msb_Preset_BL_18-6-12"
26
Materials Palette: Change
the Foreground Gradient back to
Color - #311f0e
Layers - New Raster Layer
Selections - Load/Save - Load
Selection From Disk -
"Msb_Elise_04"
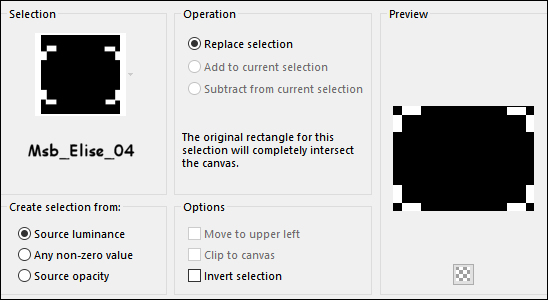
Fill the Selection
with the Foregroundcolor
Keep selected
27
Effects - Texture Effects - Blinds
Selections - Select None
Effects - Plugins - Toadies - Ommadawn
- Default settings
Layer Palette: Change
the Blend Mode of this Layer to
Soft Light and lower the
Opacity to 73
28
Maximize "24-2-06floral9_sw"
from tray
Edit - Copy
On your work image: Edit -
Paste As New Layer
Effects - Image Effects - Offset
29
Layers - Duplicate
Image - Mirror - Mirror Horizontal
Image - Resize - 60% - Resize All
Layers - not checked
Effects - Image Effects - Offset
Layers - Merge - Merge Down
Layer Palette: Change the Blend
Mode of this Layer to
Multiply and lower the
Opacity to 34
Layer Palette: Drag this Layer down
so that it sits under Raster
2
Layers - Merge - Merge All
Flatten
30
Image - Add Borders - Symmetric
checked - 1px - #d3b77d
Image - Add Borders - Symmetric
checked - 2px -
#ffe4b7
Image - Add Borders - Symmetric
checked - 1px - #d3b77d
Selections - Select All
Image - Add Borders - Symmetric
checked - 50px - #ffe4b7
Selections -
Invert
31
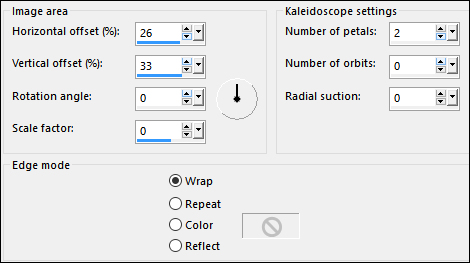
Effects - Reflection Effects -
Kaleidoscope
Adjust - Blur - Gaussian Blur -
Radius: 15
Selections - Promote Selection to
Layer
Effects - Distortion Effects -
Wave
Effects - Plugins - Graphics Plus -
Cross Shadow - Default
Configuration: 50 -50 -50 -50 -50
-50 -128 -128
Selections - Defloat
Keep selected
32
Effects - Plugins - Filters Unlimited
2.0 - &<Bkg Designer sf10 I
> - Crosstitch
Effects - 3D Effects - Drop
Shadow V:
0 H: minus 25
Opacity: 60 Blur:
1 Color: #311f0e
Selections - Select None
Effects - 3D Effects - Drop
Shadow V:
5 H: 5
Opacity: 30 Blur:
15 Color: #311f0e
Layer Palette: Change the
Blend Mode of this Layer to
Multiply and lower the
Opacity to 56
33
Maximize "kittys-Danniella"
from tray
Edit - Copy
On your work image: Edit -
Paste - Paste As New Layer
Image - Mirror - Mirror Horizontal
Image - Resize - 67% - Resize All
Layers - not checked
Effects - Image Effects - Offset
Adjust - Sharpness - Unsharp
Mask

Effects - 3D Effects - Drop
Shadow V:
15 H: 15
Opacity: 30 Blur:
25 Color: #311f0e
Image - Add Borders -
Symmetric checked - 1px - - #d3b77d
34
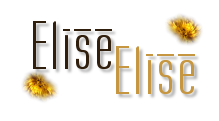
Maximize "elise-text" from
tray
Edit - Copy
On your work image: Edit -
Paste - Paste As New Layer
Move to the Bottom Right corner
like this:
Layers - Merge - Merge All
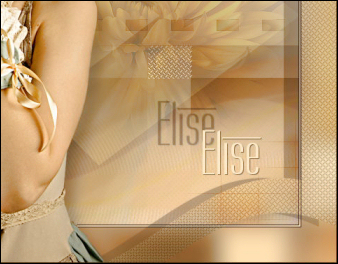
Flatten
35
Optional:
Image - Resize - Width
900 Pixels - Resize all Layers checked
Add your name or
watermark, save as JPG file and you're
done!
If you wish you can
post your result on my Facebook Page